> For the complete documentation index, see [llms.txt](https://ztrust.gitbook.io/ztrust-documentation/llms.txt). Markdown versions of documentation pages are available by appending `.md` to page URLs; this page is available as [Markdown](https://ztrust.gitbook.io/ztrust-documentation/user-manual-ztrust-v2.0/guide-to-navigation/client-scopes.md).

# Client Scopes

<figure><img src="https://1778922777-files.gitbook.io/~/files/v0/b/gitbook-x-prod.appspot.com/o/spaces%2F3EUK5AUZv0UVaI5S0CTM%2Fuploads%2FUnNdHwVJx0o9iFZmHhIN%2Fimage.png?alt=media&amp;token=0baa13af-e70b-435f-bd82-9487305ae3c1" alt=""><figcaption></figcaption></figure>

<figure><img src="https://1778922777-files.gitbook.io/~/files/v0/b/gitbook-x-prod.appspot.com/o/spaces%2F3EUK5AUZv0UVaI5S0CTM%2Fuploads%2FEyUUuYEFwRtZSK1P8ZAx%2F1.png?alt=media&amp;token=879f0b5d-a934-44f7-bcfc-536ca85fba5d" alt=""><figcaption></figcaption></figure>

You can filter the client scopes based on Name, Assigned type, and Protocol, as indicated above.

#### **Name**

This indicates the name of the client scope, which must be unique within the Realm.

#### **Assigned type**

<figure><img src="https://1778922777-files.gitbook.io/~/files/v0/b/gitbook-x-prod.appspot.com/o/spaces%2F3EUK5AUZv0UVaI5S0CTM%2Fuploads%2F0ijkxM1e4i3BaCeEupni%2F2.png?alt=media&amp;token=be1bd7a0-3d35-459c-a5bd-07d61950ec40" alt=""><figcaption></figcaption></figure>

It specifies whether the defined client scope will be incorporated by default into the configuration of each newly created client.

#### **Protocol**

This defines the protocol configuration provided by this client scope.

#### **Display order**

It defines the provider's position in the GUI as an integer.

#### **Description**

It refers to the description for the client scope, which will be helpful in identifying the purpose of the client scope.

<figure><img src="https://1778922777-files.gitbook.io/~/files/v0/b/gitbook-x-prod.appspot.com/o/spaces%2F3EUK5AUZv0UVaI5S0CTM%2Fuploads%2F566WJwRZEuPVjAEfBtdE%2F3.png?alt=media&amp;token=8f0ef4dc-ef08-4ce1-ab4f-2962abb0d9cd" alt=""><figcaption></figcaption></figure>

When you click on the three dots next to any client scope, you'll find the Delete option.&#x20;

If you want to remove a client scope that is no longer needed, simply click on Delete.

After clicking Delete, you will receive the following prompt asking for confirmation.

<figure><img src="https://1778922777-files.gitbook.io/~/files/v0/b/gitbook-x-prod.appspot.com/o/spaces%2F3EUK5AUZv0UVaI5S0CTM%2Fuploads%2FUVOi4DezkY5ZtK3zcWwk%2F4.png?alt=media&amp;token=8f675877-d91c-4d5d-b759-118c194ec029" alt=""><figcaption></figcaption></figure>

Select Delete if you want to proceed with the deletion, otherwise click Cancel.

You can search for any specific client scope by using the search box.

Click the Refresh button to see the latest settings.

<figure><img src="https://1778922777-files.gitbook.io/~/files/v0/b/gitbook-x-prod.appspot.com/o/spaces%2F3EUK5AUZv0UVaI5S0CTM%2Fuploads%2FCNGlRO6SkyRL2bhMCQeb%2F5.png?alt=media&amp;token=f3f39cf7-e293-41fd-b4ea-8cbe46cc6ee5" alt=""><figcaption></figcaption></figure>

You can also modify the number of client scopes displayed per screen by choosing your preferred option from the dropdown menu.

<figure><img src="https://1778922777-files.gitbook.io/~/files/v0/b/gitbook-x-prod.appspot.com/o/spaces%2F3EUK5AUZv0UVaI5S0CTM%2Fuploads%2FuEoW08jFOoLvUx27jtVu%2F6.png?alt=media&amp;token=90633ba5-285c-4512-b209-799fd7870b1a" alt=""><figcaption></figcaption></figure>

You can select a specific client scope by clicking on the checkbox next to it. This is particularly useful if you want to make changes to multiple client scopes simultaneously.&#x20;

If you wish to delete multiple client scopes, simply click on the checkboxes next to them, then click on the three dots next to Change Type to and select Delete.

<figure><img src="https://1778922777-files.gitbook.io/~/files/v0/b/gitbook-x-prod.appspot.com/o/spaces%2F3EUK5AUZv0UVaI5S0CTM%2Fuploads%2FRPzTG09AGSj4b6WQbIt5%2F7.png?alt=media&amp;token=6aa052e9-34b6-478d-a52c-024cbe806da8" alt=""><figcaption></figcaption></figure>

To change the Assigned type of multiple client scopes simultaneously, first select all the relevant scopes. Then, click on Change type to, and choose the preferred option based on your requirements.

<figure><img src="https://1778922777-files.gitbook.io/~/files/v0/b/gitbook-x-prod.appspot.com/o/spaces%2F3EUK5AUZv0UVaI5S0CTM%2Fuploads%2FA6vdBqezPljFSPrpDHEp%2F8.png?alt=media&amp;token=3f5944d8-1d77-49a5-ac76-c28683b37c74" alt=""><figcaption></figcaption></figure>

If you want to establish a new client scope, click on Create client scope.

Upon clicking Create client scope, you will be directed to the following screen.

<figure><img src="https://1778922777-files.gitbook.io/~/files/v0/b/gitbook-x-prod.appspot.com/o/spaces%2F3EUK5AUZv0UVaI5S0CTM%2Fuploads%2FkpfyZG5tOagrOMFBPvOa%2F9.png?alt=media&amp;token=4fed5c63-eaa8-4f3e-ae4e-6d7ccb0126c4" alt=""><figcaption></figcaption></figure>

#### **Name**

This indicates the name of the client scope, which must be unique within the Realm.

The name should not include space characters, as it is utilized as the value of the scope parameter.

#### **Description**

It refers to the description for the client scope, which will be helpful in identifying the purpose of the client.

#### Type

<figure><img src="https://1778922777-files.gitbook.io/~/files/v0/b/gitbook-x-prod.appspot.com/o/spaces%2F3EUK5AUZv0UVaI5S0CTM%2Fuploads%2F8PgevPEFBXPGFz9pRVBc%2F10.png?alt=media&amp;token=ac8ebee5-3f2c-4c83-8cda-0bc238530145" alt=""><figcaption></figcaption></figure>

It indicates whether the defined client scope will be incorporated by default into the configuration of each newly created client.

#### **Protocol**

This defines the protocol configuration provided by this client scope.

<figure><img src="https://1778922777-files.gitbook.io/~/files/v0/b/gitbook-x-prod.appspot.com/o/spaces%2F3EUK5AUZv0UVaI5S0CTM%2Fuploads%2FKoXfghqc16PaYMRd8YDE%2F11.png?alt=media&amp;token=1699ab04-d403-4861-af38-49bf2707711d" alt=""><figcaption></figcaption></figure>

You can choose the most suitable option from the dropdown based on your needs.

#### **Display on consent screen**

This toggle button, when activated (toggled ON), will display the text specified by Consent Screen Text on the consent screen if this client scope is added to a client with consent required.

If deactivated (toggled OFF), this client scope will not appear on the consent screen.

You can toggle it ON or OFF according to your needs.

#### **Consent screen text**

This pertains to the text that will be shown when this client scope is added to a client with consent required.

By default, it displays the name of the client scope if left empty.

#### **Include In Token Scope**

This toggle button, when activated (toggled ON), will include the name of this client scope in the access token property scope and in the Token Introspection Endpoint response.

If deactivated (toggled OFF), this client scope will be excluded from the token and from the Token Introspection Endpoint response.&#x20;

You can toggle it ON or OFF according to your needs.

#### **Display order**

It defines the provider's position in the GUI as an integer.

#### **Save**

If you want to create a client scope with all the specified details, click on Save to apply your changes.

#### **Cancel**

If you do not create the client scope with the provided details, click on Cancel to discard the changes.

After clicking on Save, you will be taken to the following screen.

<figure><img src="https://1778922777-files.gitbook.io/~/files/v0/b/gitbook-x-prod.appspot.com/o/spaces%2F3EUK5AUZv0UVaI5S0CTM%2Fuploads%2F2do8JHbvJOzm39KvHqTu%2F12.png?alt=media&amp;token=e817bcb1-c993-451e-a0c4-988bc5cfe57e" alt=""><figcaption></figcaption></figure>

You can view the same settings here that you previously configured.

If any changes are made and you want to save them, click Save. Otherwise, click Cancel.

<figure><img src="https://1778922777-files.gitbook.io/~/files/v0/b/gitbook-x-prod.appspot.com/o/spaces%2F3EUK5AUZv0UVaI5S0CTM%2Fuploads%2FaeR1zFeD0QVwK4z57071%2F13.png?alt=media&amp;token=65456805-369d-4367-9117-d50e3bfa5ecd" alt=""><figcaption></figcaption></figure>

#### **Mappers**

Protocol Mappers facilitate transformations on tokens and documents.&#x20;

They are capable of tasks such as mapping user data into protocol claims or transforming any requests exchanged between the client and authentication server.

#### **Configure a new mapper**

To create a new Protocol Mapper, simply click on Configure a new mapper.

When you click on Configure a new mapper, a prompt will be displayed as shown below.

<figure><img src="https://1778922777-files.gitbook.io/~/files/v0/b/gitbook-x-prod.appspot.com/o/spaces%2F3EUK5AUZv0UVaI5S0CTM%2Fuploads%2FvVL6kbe4GOwnwplsRru6%2F14.png?alt=media&amp;token=3e9309ed-8ed2-4896-a4da-6d64996228b8" alt=""><figcaption></figcaption></figure>

<figure><img src="https://1778922777-files.gitbook.io/~/files/v0/b/gitbook-x-prod.appspot.com/o/spaces%2F3EUK5AUZv0UVaI5S0CTM%2Fuploads%2FEoYHJ5y6C1sFFnmasHJ3%2F15.png?alt=media&amp;token=fe0f436a-e0d2-4a0c-94ef-e3482ac719c9" alt=""><figcaption></figcaption></figure>

You can choose the specific mapper you wish to configure.&#x20;

For example, here, the Claims parameter Token is selected.&#x20;

Clicking on Claims parameter Token will redirect you to the screen shown below.

<figure><img src="https://1778922777-files.gitbook.io/~/files/v0/b/gitbook-x-prod.appspot.com/o/spaces%2F3EUK5AUZv0UVaI5S0CTM%2Fuploads%2FepdFBqRvM5vWpoy5U0qK%2F16.png?alt=media&amp;token=ef71dd88-a811-43ea-89d3-dc8d755944a7" alt=""><figcaption></figcaption></figure>

#### **Mapper Type**

This indicates the type of mapper that you have selected.

#### **Name**

This denotes the name of the mapper, which you can customize according to your needs.

#### **Add to ID Token**

This toggle button controls whether the claim can be added to the ID Token.

When activated (toggled ON), the claim can be included in the ID Token.

Conversely, when deactivated (toggled OFF), the claim is not added to the ID Token.

You can adjust this setting as needed by toggling it ON or OFF.

#### **Add to userinfo**

This toggle button determines whether the claim should be added to the userinfo.&#x20;

When activated (toggled ON), the claim will be included in the userinfo.

If deactivated (toggled OFF), the claim will not be added to the userinfo.

You can toggle this setting ON or OFF according to your requirements.

#### **Save**

To apply the changes you've made, click on Save.

#### **Cancel**

If you prefer not to incorporate the changes, click on Cancel to discard them.

You can review the table below to observe the various types of mappers and their respective purposes.

<table><thead><tr><th width="224">Mapper Type</th><th>Description</th></tr></thead><tbody><tr><td>Claims parameter Token</td><td>The claims specified by the claims parameter are included in the tokens.</td></tr><tr><td>User Realm Role</td><td>Associate the user realm role with a token claim.</td></tr><tr><td>User Session Note</td><td>Connect a custom user session note to a token claim.</td></tr><tr><td>Claims parameter with value ID Token</td><td>Claims specified with a value by the claims parameter are included in an <a href="/ztrust-documentation/user-manual-ztrust-v2.0/key-terminologies.md#identity-token">ID Token</a>.</td></tr><tr><td>User Address</td><td>Associate user address attributes (street, locality, region, postal_code, and country) with the OpenID Connect ‘address’ claim.</td></tr><tr><td>Role Name Mapper</td><td>Assign a role to a new name or position in the token.</td></tr><tr><td>User Client Role</td><td>Associate a user client role with a token claim.</td></tr><tr><td>User Property</td><td>Map a built-in user property (email, firstName, lastName) to a token claim.</td></tr><tr><td>Authentication Context Class Reference (ACR)</td><td>Assign the achieved <a href="/ztrust-documentation/user-manual-ztrust-v2.0/key-terminologies.md#level-of-authentication-loa">Level of Authentication (LoA)</a> to the ‘acr’ claim of the token.</td></tr><tr><td>Hardcoded Role</td><td>Hardcode a role into the access token.</td></tr><tr><td>Hardcoded claim</td><td>Hardcode a claim into the token</td></tr><tr><td>Pairwise subject identifier</td><td>Generates a pairwise subject identifier using a <a href="/ztrust-documentation/user-manual-ztrust-v2.0/key-terminologies.md#salted-sha-256-hash">salted SHA-256 hash</a>.</td></tr><tr><td>User’s full name</td><td>Associates the user's first and last name with the OpenID Connect 'name' claim.</td></tr><tr><td>Allowed Web Origins</td><td>Includes all permitted web origins in the 'allowed-origins' claim within the token.</td></tr><tr><td>Audience</td><td>Append the specified audience to the 'audience' (aud) field of the token.</td></tr><tr><td>User Attribute</td><td>Connect a custom user attribute with a token claim.</td></tr><tr><td>Group Membership</td><td>Map user group membership.</td></tr><tr><td>Audience Resolve</td><td>Include all client_ids of 'allowed' clients in the audience field of the token. An 'allowed' client refers to a client for which the user has at least one client role.</td></tr></tbody></table>

<figure><img src="https://1778922777-files.gitbook.io/~/files/v0/b/gitbook-x-prod.appspot.com/o/spaces%2F3EUK5AUZv0UVaI5S0CTM%2Fuploads%2FUs0J6W6LsW67ZyuxuL0O%2F17.png?alt=media&amp;token=b2c81e16-e3f4-4b2f-a4e1-8bc5654a33c9" alt=""><figcaption></figcaption></figure>

You can also add predefined mappers by clicking on Add predefined mapper to select the necessary mappers.&#x20;

When you click on Add predefined mapper, the prompt shown below will be displayed.

<figure><img src="https://1778922777-files.gitbook.io/~/files/v0/b/gitbook-x-prod.appspot.com/o/spaces%2F3EUK5AUZv0UVaI5S0CTM%2Fuploads%2F946p60H1GwHdbOnAJ2fx%2F18.png?alt=media&amp;token=99447f8e-6236-4815-af4b-84574d9d0229" alt=""><figcaption></figcaption></figure>

You can use the search box to find a specific mapper.&#x20;

Click the Refresh button to see the latest settings.

There are 29 predefined mappers available for you to choose from.

<figure><img src="https://1778922777-files.gitbook.io/~/files/v0/b/gitbook-x-prod.appspot.com/o/spaces%2F3EUK5AUZv0UVaI5S0CTM%2Fuploads%2FEhQ9FSDA4KQiVXnkFarm%2F19.png?alt=media&amp;token=e6edb5bf-a40c-4f2d-a41b-0211cafafff4" alt=""><figcaption></figcaption></figure>

You can also choose how many mappers you want to display on one screen. Select your preferred option from the dropdown menu as shown below.

If you want to select a specific mapper from the predefined mapper list, click on the checkbox for that particular mapper.

This will select the corresponding mapper.&#x20;

At the bottom, there's an option to Add. Click on Add to add the chosen predefined mappers.

<figure><img src="https://1778922777-files.gitbook.io/~/files/v0/b/gitbook-x-prod.appspot.com/o/spaces%2F3EUK5AUZv0UVaI5S0CTM%2Fuploads%2F4pBBjK1JqmBs8SnIOFVR%2F20.png?alt=media&amp;token=b632bf3c-190e-4a2e-ac9f-6552608a0986" alt=""><figcaption></figcaption></figure>

Once added, the particular mapper will be visible under the Mappers tab, as shown below.

<figure><img src="https://1778922777-files.gitbook.io/~/files/v0/b/gitbook-x-prod.appspot.com/o/spaces%2F3EUK5AUZv0UVaI5S0CTM%2Fuploads%2FOBjLpZutFUgYOMQppbaM%2F21.png?alt=media&amp;token=3b366c80-45bc-4a28-ae7c-bdc7b2848545" alt=""><figcaption></figcaption></figure>

#### **Name**

This displays the names of the existing predefined mappers.

#### **Category**

This section categorizes the mentioned mappers.

#### **Type**

This specifies the type of the predefined mappers.

#### **Priority**

Mapper implementations are prioritized based on their order in the list of mappers.

Priority order is not the configuration property of the mapper. It is the property of the concrete implementation of the mapper.

This order dictates the sequence in which changes to the token or assertion are applied, with the lowest priority mappers being processed first.

This ensures that implementations dependent on others are executed in the required order.

<figure><img src="https://1778922777-files.gitbook.io/~/files/v0/b/gitbook-x-prod.appspot.com/o/spaces%2F3EUK5AUZv0UVaI5S0CTM%2Fuploads%2F3PLCQqR8BPX7x36aYDMS%2F28.png?alt=media&amp;token=72d33ebb-27b5-46ac-8dd1-a2518a3bc863" alt=""><figcaption></figcaption></figure>

After clicking on the three dots, you will see an option to delete the specific mapper.

If you wish to delete that particular mapper, click on Delete.

<figure><img src="https://1778922777-files.gitbook.io/~/files/v0/b/gitbook-x-prod.appspot.com/o/spaces%2F3EUK5AUZv0UVaI5S0CTM%2Fuploads%2FIJjdY7V2QQqUqzdzmR2Q%2F22.png?alt=media&amp;token=655bbd9a-3904-4012-a957-43a55de2908e" alt=""><figcaption></figcaption></figure>

<figure><img src="https://1778922777-files.gitbook.io/~/files/v0/b/gitbook-x-prod.appspot.com/o/spaces%2F3EUK5AUZv0UVaI5S0CTM%2Fuploads%2FT8zTMzYFUSTxdoYUEyCj%2F23.png?alt=media&amp;token=a90d5849-1c18-436a-a54d-0501162def82" alt=""><figcaption></figcaption></figure>

#### **Scope**

This configuration enables you to limit the user role mappings included in the access token requested by the client.

To assign roles, select Assign role.&#x20;

Upon clicking this, you will be presented with the prompt shown below.

<figure><img src="https://1778922777-files.gitbook.io/~/files/v0/b/gitbook-x-prod.appspot.com/o/spaces%2F3EUK5AUZv0UVaI5S0CTM%2Fuploads%2FNLi6JLk0pU00GxLAB5Ji%2F24.png?alt=media&amp;token=5f19622c-ea39-4b1a-902a-6597b18e9401" alt=""><figcaption></figcaption></figure>

<figure><img src="https://1778922777-files.gitbook.io/~/files/v0/b/gitbook-x-prod.appspot.com/o/spaces%2F3EUK5AUZv0UVaI5S0CTM%2Fuploads%2FErH3Nytyyn8h44qZvwXM%2F25.png?alt=media&amp;token=9a712f6e-429c-4f1d-96e0-8cae4ba24ba8" alt=""><figcaption></figcaption></figure>

Here, you can filter roles based on clients or realm roles.

<figure><img src="https://1778922777-files.gitbook.io/~/files/v0/b/gitbook-x-prod.appspot.com/o/spaces%2F3EUK5AUZv0UVaI5S0CTM%2Fuploads%2FH9whUlBuE0UtvDmSVNhm%2F26.png?alt=media&amp;token=c76764ed-4b76-4cce-92a0-b2031ed21d01" alt=""><figcaption></figcaption></figure>

If you want to select a specific role from the list, click on the checkbox for that particular role.

This will select the corresponding role.&#x20;

At the bottom, there's an option to Assign. Click on Assign to add the chosen roles.

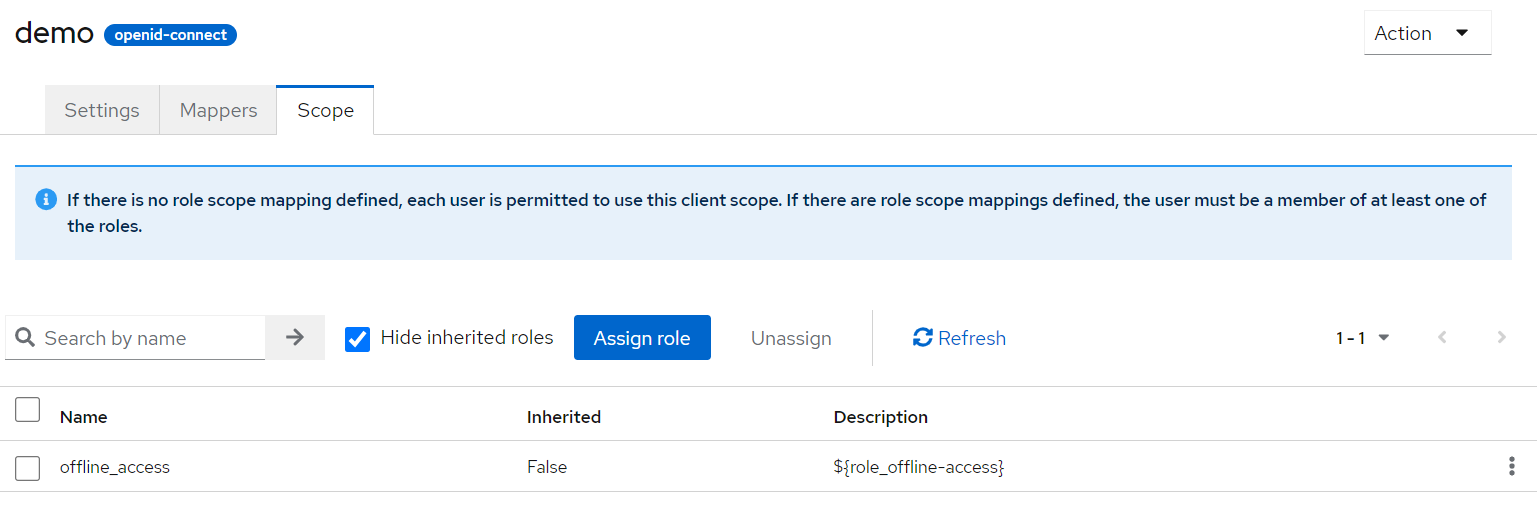
Once added, the particular role will be visible in the scope list, as shown below.

<figure><img src="https://1778922777-files.gitbook.io/~/files/v0/b/gitbook-x-prod.appspot.com/o/spaces%2F3EUK5AUZv0UVaI5S0CTM%2Fuploads%2FVGuZquMFYBOdc6rHbMJG%2F27.png?alt=media&amp;token=c9302245-fe18-4b6f-aa9d-c8ea0ad91b31" alt=""><figcaption></figcaption></figure>

#### **Name**

It includes the list of all the different roles that are already assigned to this client.

#### **Inherited**

This pertains to roles explicitly assigned to users and those inherited from composite roles. It can have two values: True (indicating the role is inherited from composites) or False (indicating it is not inherited from any composite role).

#### **Description**

It refers to the description for the role which will aid you in identifying its purpose.

This field can be localized by specifying a substitution variable with **${var-name}** strings.

<figure><img src="https://1778922777-files.gitbook.io/~/files/v0/b/gitbook-x-prod.appspot.com/o/spaces%2F3EUK5AUZv0UVaI5S0CTM%2Fuploads%2FkvlGioWURlULDbKS8cQx%2F1.png?alt=media&amp;token=6eb85ae2-0edf-4cbe-99aa-88643a79d11f" alt=""><figcaption></figcaption></figure>

By clicking on the three dots, you can access the option to unassign. If a role is no longer needed for any client, simply click on Unassign.

<figure><img src="https://1778922777-files.gitbook.io/~/files/v0/b/gitbook-x-prod.appspot.com/o/spaces%2F3EUK5AUZv0UVaI5S0CTM%2Fuploads%2FetpP5LwIOW5Zq5fHRWq2%2F2.png?alt=media&amp;token=7f59c43b-bc2c-43d4-9e46-942987377601" alt=""><figcaption></figcaption></figure>

Upon clicking Unassign, you will receive a confirmation prompt. To remove a specific role, click Remove; otherwise, click Cancel.

If you wish to unassign multiple roles, simply click on the checkbox next to each role you want to select. Once selected, click on Unassign to proceed.

You will receive the following prompt requesting confirmation.

<figure><img src="https://1778922777-files.gitbook.io/~/files/v0/b/gitbook-x-prod.appspot.com/o/spaces%2F3EUK5AUZv0UVaI5S0CTM%2Fuploads%2FNCXWXku4absHcXlvPMji%2F3.png?alt=media&amp;token=acc31a88-78cf-458d-bf68-e7f71471a6ff" alt=""><figcaption></figcaption></figure>

To remove a specific role, click Remove; otherwise, click Cancel.

#### **Hide inherited roles**

Selecting this checkbox hides inherited roles, preventing you from seeing roles inherited from composites.&#x20;

To view inherited roles, simply uncheck this option.

<figure><img src="https://1778922777-files.gitbook.io/~/files/v0/b/gitbook-x-prod.appspot.com/o/spaces%2F3EUK5AUZv0UVaI5S0CTM%2Fuploads%2F18aRQDwZ7s1jAZ1m9e0y%2F4.png?alt=media&amp;token=52fa2a56-70cd-4ba1-93b1-9fbd273f35dd" alt=""><figcaption></figcaption></figure>

You can also choose how many roles you want to display on one screen. Select your preferred option from the dropdown menu as shown above.

You can search for any specific role by using the search box.

Click the Refresh button to see the latest settings.

<figure><img src="https://1778922777-files.gitbook.io/~/files/v0/b/gitbook-x-prod.appspot.com/o/spaces%2F3EUK5AUZv0UVaI5S0CTM%2Fuploads%2FRoSIilyYPaM8ViaJL4ze%2F5.png?alt=media&amp;token=69f5674e-272a-4569-b89d-686fca185ed6" alt=""><figcaption></figcaption></figure>

You can also delete the entire client scope by clicking on Action at the top right corner and selecting Delete.

Upon clicking Delete, you will receive the following prompt requesting confirmation.&#x20;

<figure><img src="https://1778922777-files.gitbook.io/~/files/v0/b/gitbook-x-prod.appspot.com/o/spaces%2F3EUK5AUZv0UVaI5S0CTM%2Fuploads%2FDAsYYefuwjxIqesiD5zt%2F6.png?alt=media&amp;token=6ddbf423-3df5-4f44-b868-755662208158" alt=""><figcaption></figcaption></figure>

Click Delete to proceed with the removal, or click Cancel to retain it.