ZTrust Documentation
  • User Manual - ZTrust V3.0
    • Key Terminologies
    • Guide to Navigation
      • Clients
        • Clients List
        • Initial Access Token
        • Client Registration
      • Client Scopes
      • Realm Roles
      • Users
      • Groups
      • Sessions
      • Events
        • User events
        • Admin events
      • Realm Settings
        • General
        • Login
        • Email
        • Themes
        • Keys
        • Events
        • Localization
        • Security Defenses
        • Sessions
        • Tokens
        • Client Policies
        • User profile
        • User Registration
      • Authentication
        • Flows
        • Required Actions
        • Policies
      • Identity Providers
      • User Federation
    • Admin Manual
      • Creation of a Realm
      • Creation of a User
        • Login to Account Console
      • How to set up Password Invalidator
      • How to set up Password Policies
      • How to set up Brute Force Detection feature
      • How to enable the One-to-Many feature
      • How to set up Multi-Factor Authentication
        • Setup of ReCAPTCHA registration flow
        • Setup of ReCAPTCHA login flow
        • Setup of OTP Based Registration
        • Setup of OTP Based Login
        • Setup of QR Code Based Authentication
        • Setup of Push Notification Based Authentication
        • Setup of Biometric based Authentication
        • How to set-up 2FA Authentication
      • ZTrust Authenticator App
      • Self-Service Portal (SSP)
        • Authenticator Setup from Self-Service Portal
        • Set Your Profile Photo in Self-Servicce Portal
      • How to setup Session Invalidator feature
      • How to setup GDPR Compliant feature
      • How to set up Social Media login
      • How to setup Inactive User Tracking feature
      • How to setup Archive Inactive User feature
      • Role-Specific Attribute Based Access Control at client level
      • Self-Role Request at the Business Level
      • Self-Role Request at the Application Level
      • How to setup Delete Archived/Inactive User feature
      • Reporting Module
      • Geo Tagging and Fencing
      • Event Type
  • Release Notes
    • ZTrust V3.1.0
    • ZTrust V3.0.0
    • ZTrust V2.1.0
    • ZTrust V2.0.1
    • ZTrust V2.0.0
    • ZTrust V1.0.4
    • ZTrust V1.0.3
    • ZTrust V1.0.2
    • ZTrust V1.0.1
    • ZTrust V1.0.0
  • Frequently Asked Questions
  • User Manual - ZTrust V2.0
    • Key Terminologies
    • Guide to Navigation
      • Clients
        • Clients List
        • Initial Access Token
        • Client Registration
      • Client Scopes
      • Realm Roles
      • Users
      • Groups
      • Sessions
      • Events
        • User events
        • Admin events
      • Realm Settings
        • General
        • Login
        • Email
        • Themes
        • Keys
        • Events
        • Localization
        • Security Defenses
        • Sessions
        • Tokens
        • Client Policies
        • User profile
        • User Registration
      • Authentication
        • Flows
        • Required Actions
        • Policies
      • Identity Providers
      • User Federation
    • Admin Manual
      • Creation of a Realm
      • Creation of a User
        • Login to Account Console
      • How to set up Password Invalidator
      • How to set up Password Policies
      • How to set up Brute Force Detection feature
      • How to enable the One-to-Many feature
      • How to set up Multi-Factor Authentication
        • Setup of ReCAPTCHA registration flow
        • Setup of ReCAPTCHA login flow
        • Setup of OTP Based Registration
        • Setup of OTP Based Login
        • Setup Time-based One-Time Password (TOTP) Based Login
        • Setup of QR Code Based Authentication
        • Setup of Push Notification Based Authentication
        • Setup of Biometric based Authentication
        • How to set-up 2FA Authentication
      • How to setup Session Invalidator feature
      • How to setup GDPR Compliant feature
      • How to set up Social Media login
      • How to setup Inactive User Tracking feature
      • How to setup Archive Inactive User feature
      • How to setup Delete Archived/Inactive User feature
      • Role-Specific Attribute Based Access Control at client level
      • Reporting Module
      • Geo Tagging and Fencing
      • Event Type
  • User Manual - ZTrust V1.0
    • Guide to Navigation
      • Realm Settings
        • General
        • Login
        • Keys
        • Email
        • Themes
        • RabbitMQ Config
        • Localization
        • Cache
        • Tokens
        • Client Registration
        • Client Policies
        • Security Defenses
      • Clients
      • Client Scopes
        • Default Client Scopes
      • Roles
        • Realm Roles
        • Default Roles
      • Identity Providers
      • User Federation
      • Authentication
        • Flows
        • Bindings
        • Required Actions
        • Password Policy
        • OTP Policy
        • WebAuthn Policy
        • WebAuthn Passwordless Policy
        • CIBA Policy
      • Groups
        • Default Groups
      • Users
      • Sessions
        • Realm Sessions
        • Revocation
      • Events
        • Login Events
        • Admin Events
        • Config
      • Import
      • Export
    • Admin Manual
      • Creation of a Realm
      • Creation of a User
        • Login to Account Console
      • How to set up Password Invalidator
      • How to set up Password Policies
      • How to set up Brute Force Detection feature
      • How to enable the One-to-Many feature
      • How to set up Multi-Factor Authentication
        • Setup of ReCAPTCHA registration flow
        • Setup of ReCAPTCHA login flow
        • Setup of OTP Based Registration
        • Setup of OTP Based Login
        • Setup of QR Code Based Authentication
        • Setup of Push Notification Based Authentication
        • Setup of Biometric based Authentication
      • How to setup Session Invalidator feature
      • How to setup GDPR Compliant feature
      • How to set up Social Media login
      • How to setup Inactive User Tracking feature
      • How to setup Archive Inactive User feature
      • How to setup Delete Archived/Inactive User feature
Powered by GitBook
On this page
  1. User Manual - ZTrust V2.0
  2. Guide to Navigation
  3. Authentication

Flows

PreviousAuthenticationNextRequired Actions

Last updated 11 months ago

In Authentication, within the Flows tab, various workflows for Registration, Login, and other processes are available.

New flows can be created as needed within this section.

You can use the search box to find a specific flow.

Click the Refresh button to see the latest settings.

You can also choose how many flows you want to display on one screen. Select your preferred option from the dropdown menu as shown above.

To create a completely new flow, click on the Create flow button.

Click on three dots, then duplicate to copy the existing flow.

When you click on Create flow, you'll be directed to the following screen.

Name

It specifies the name of the flow.

Description

This pertains to the description you can provide for a specific flow, which helps in accurately identifying the purpose of that flow.

Flow type

It indicates the type of flow. There are two options:

  • Client flow: It is used for authentication of clients (applications)

  • Basic flow: It is used for users and everything else

Create

After clicking on Create, you will get the below screen.

Cancel

After making the changes, if you don't want to create the flow, click on Cancel.

You'll encounter two choices:

Add an execution

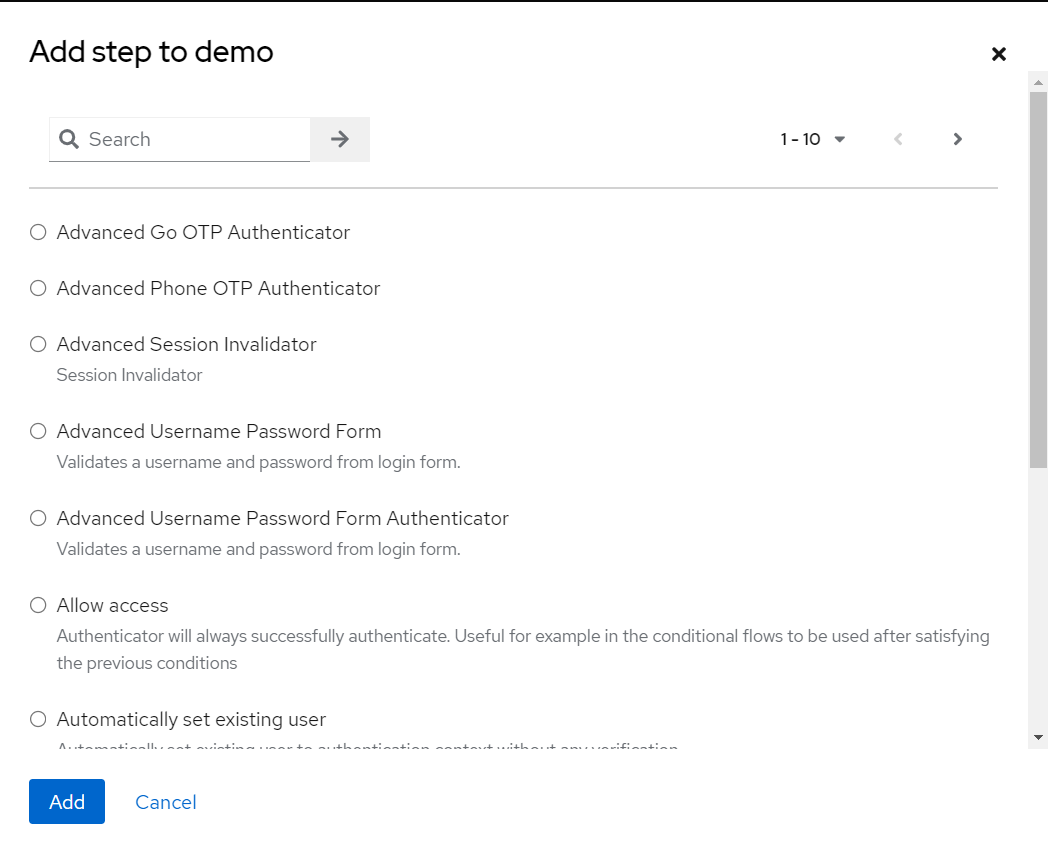
  • Selecting this option will lead you to the screen below.

  • Choose the suitable step to include in this flow, and click on Add.

  • If you decide not to add anything, simply click Cancel.

Add a sub-flow

  • Selecting this option will redirect you to the below screen.

  • Name - It specifies the name of the flow.

  • Description - It helps in accurately identifying the purpose of that flow.

  • Flow type - It can be either Generic or Form.

  • If you want to incorporate the changes done, click on Add.

  • If you decide not to add anything, simply click Cancel.

Upon clicking the three dots, you will see options to duplicate, bind flow, and delete, as depicted below.

When you choose Duplicate, you'll be presented with a prompt as depicted below.

You have the flexibility to input the name and description according to your preferences.

If you prefer not to continue, simply click on Cancel.

When you select Duplicate, you will be taken to the screen below.

You have the option to modify the various steps using the icons (Edit, Delete among others) provided above.

Upon clicking Bind flow, you will receive the prompt below.

Choose binding type

You have the option to choose the appropriate flow with which you want to bind the flow you created.

You can choose the desired flow from the dropdown menu based on your needs.

Selecting Delete will prompt a confirmation message as shown below.

Click Delete to remove the flow, or click Cancel to retain it.