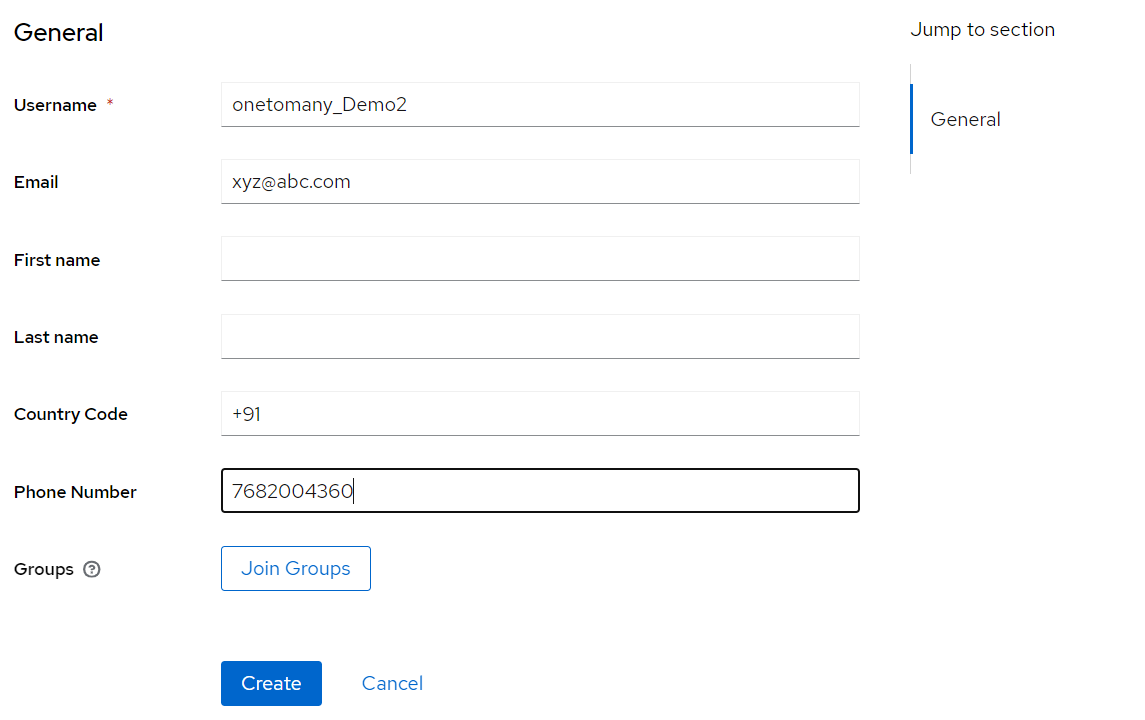
# How to enable the One-to-Many feature

It is an add-on on-demand feature which can be requested. It provides convenient monitoring and tracking capabilities. It enables users to associate a single phone number or email address with multiple user IDs, thereby providing authentication for selected users.<br>

1. Go to the Authentication tab.

<figure><img src="https://1778922777-files.gitbook.io/~/files/v0/b/gitbook-x-prod.appspot.com/o/spaces%2F3EUK5AUZv0UVaI5S0CTM%2Fuploads%2FNR3evMD6tCsxplFwSonU%2F1.png?alt=media&#x26;token=59c53b03-56cf-4d60-bf0e-17ec7e41e2af" alt=""><figcaption></figcaption></figure>

2. Click on Duplicate on the right side and create a Copy of the Browser flow.

<figure><img src="https://1778922777-files.gitbook.io/~/files/v0/b/gitbook-x-prod.appspot.com/o/spaces%2F3EUK5AUZv0UVaI5S0CTM%2Fuploads%2Fa6gOGxQw3pTsGoskS64l%2F2.png?alt=media&#x26;token=9ea5cc82-d66c-4714-a1bb-e1a624307d60" alt=""><figcaption></figcaption></figure>

3. Give any name to the copy of browser flow as - One-to-Many Browser Flow.

<figure><img src="https://1778922777-files.gitbook.io/~/files/v0/b/gitbook-x-prod.appspot.com/o/spaces%2F3EUK5AUZv0UVaI5S0CTM%2Fuploads%2FJANErmFnPHSZFSSb6bSx%2F3.png?alt=media&#x26;token=3de1b6ac-462f-4da2-864a-f107abf47f16" alt=""><figcaption></figcaption></figure>

4. Click on Duplicate.

<figure><img src="https://1778922777-files.gitbook.io/~/files/v0/b/gitbook-x-prod.appspot.com/o/spaces%2F3EUK5AUZv0UVaI5S0CTM%2Fuploads%2FEGt5pUe9K65IEnOWLEeT%2F4.png?alt=media&#x26;token=d11c0a4b-ee5f-4670-8227-432a3c4956d2" alt=""><figcaption></figcaption></figure>

5. Click on Add Step.
6. Select One to Many.

<figure><img src="https://1778922777-files.gitbook.io/~/files/v0/b/gitbook-x-prod.appspot.com/o/spaces%2F3EUK5AUZv0UVaI5S0CTM%2Fuploads%2FjefH8fYAVPRe03w7U6e6%2F5.png?alt=media&#x26;token=1fc942cc-7f2b-4f7b-ac21-4b8f79cf1c0f" alt=""><figcaption></figcaption></figure>

7. Click on Add.
8. It will be created with Requirement as Disabled. Change this to Alternative.

<figure><img src="https://1778922777-files.gitbook.io/~/files/v0/b/gitbook-x-prod.appspot.com/o/spaces%2F3EUK5AUZv0UVaI5S0CTM%2Fuploads%2FBARhUp30S3doW0V0V32X%2F6.png?alt=media&#x26;token=ccf9739d-ea4d-4e1b-aea0-176c22f77774" alt=""><figcaption></figcaption></figure>

9. Now, click on Settings.

<figure><img src="https://1778922777-files.gitbook.io/~/files/v0/b/gitbook-x-prod.appspot.com/o/spaces%2F3EUK5AUZv0UVaI5S0CTM%2Fuploads%2Fst3u0QU7OZwMVgH7A5oZ%2F7.png?alt=media&#x26;token=4db82c59-f7fe-472c-9223-24aea865deb9" alt=""><figcaption></figcaption></figure>

10. Now add the required configurations.

<figure><img src="https://1778922777-files.gitbook.io/~/files/v0/b/gitbook-x-prod.appspot.com/o/spaces%2F3EUK5AUZv0UVaI5S0CTM%2Fuploads%2FHlA6PSbJd5ljMroLgyCI%2F8.png?alt=media&#x26;token=3e796cae-ffb4-4957-bc48-e3e3d2257a47" alt=""><figcaption></figcaption></figure>

11. Go to Realm Settings.

<figure><img src="https://1778922777-files.gitbook.io/~/files/v0/b/gitbook-x-prod.appspot.com/o/spaces%2F3EUK5AUZv0UVaI5S0CTM%2Fuploads%2FAJUoQH9ygUSzU1hUT3IB%2F9.png?alt=media&#x26;token=830bffb5-794c-438b-953e-59ead0dc1838" alt=""><figcaption></figcaption></figure>

12. Go to User profile.

<figure><img src="https://1778922777-files.gitbook.io/~/files/v0/b/gitbook-x-prod.appspot.com/o/spaces%2F3EUK5AUZv0UVaI5S0CTM%2Fuploads%2FOe1YktVe4SDuBY7J9FrY%2F10.png?alt=media&#x26;token=b4b6e0a0-8c21-409b-a7a2-581c9d2d2114" alt=""><figcaption></figcaption></figure>

13. Click on Create attribute.
14. Enter the Attribute \[Name] as countryCode and the Display Name as Country Code.

<figure><img src="https://1778922777-files.gitbook.io/~/files/v0/b/gitbook-x-prod.appspot.com/o/spaces%2F3EUK5AUZv0UVaI5S0CTM%2Fuploads%2FLYl5Xr7M37fcD2KPetQf%2F11.png?alt=media&#x26;token=600c45a2-385a-454a-9d1d-eb723a2b78b7" alt=""><figcaption></figcaption></figure>

15. Click on Create.

<figure><img src="https://1778922777-files.gitbook.io/~/files/v0/b/gitbook-x-prod.appspot.com/o/spaces%2F3EUK5AUZv0UVaI5S0CTM%2Fuploads%2Fjx6Pjtu1aHJgqjJtRyGF%2F12.png?alt=media&#x26;token=feafa03c-cc9f-4ef3-b0b1-7003fe7abd4d" alt=""><figcaption></figcaption></figure>

16. Again, click on Create attribute.
17. Enter the Attribute \[Name] as phone and Display Name as Phone Number.

<figure><img src="https://1778922777-files.gitbook.io/~/files/v0/b/gitbook-x-prod.appspot.com/o/spaces%2F3EUK5AUZv0UVaI5S0CTM%2Fuploads%2Fdl3TAiaVDWAICdpfHyR5%2F13.png?alt=media&#x26;token=133645c6-1149-48eb-9f54-418636fa7ff0" alt=""><figcaption></figcaption></figure>

18. Click on Create.
19. Now go to the Users tab.

<figure><img src="https://1778922777-files.gitbook.io/~/files/v0/b/gitbook-x-prod.appspot.com/o/spaces%2F3EUK5AUZv0UVaI5S0CTM%2Fuploads%2F0dwX6ymsg9fIfIHtUKhi%2F14.png?alt=media&#x26;token=ba637b3d-8405-4bf3-8bd2-e2bb18515a7a" alt=""><figcaption></figcaption></figure>

20. Click on Add User.

<figure><img src="https://1778922777-files.gitbook.io/~/files/v0/b/gitbook-x-prod.appspot.com/o/spaces%2F3EUK5AUZv0UVaI5S0CTM%2Fuploads%2FrC8lcig1nGN5B7fyspQT%2F15.png?alt=media&#x26;token=e8304146-3022-483b-8fb4-e5e716b63458" alt=""><figcaption></figcaption></figure>

21. Fill the required details

<table><thead><tr><th width="138">Field Name</th><th width="187">Mandatory (Yes/No)</th><th width="108">Field Type</th><th>Description</th></tr></thead><tbody><tr><td>Username</td><td>Yes</td><td>Text</td><td>Enter the username for the user</td></tr><tr><td>Email </td><td>Yes</td><td>Text</td><td>Enter the preferred Email ID of User</td></tr><tr><td>First Name</td><td>No</td><td>Text</td><td>Enter the First name of User</td></tr><tr><td>Last Name</td><td>No</td><td>Text</td><td>Enter the Last name or Surname of User</td></tr></tbody></table>

<figure><img src="https://1778922777-files.gitbook.io/~/files/v0/b/gitbook-x-prod.appspot.com/o/spaces%2F3EUK5AUZv0UVaI5S0CTM%2Fuploads%2FPmFE2CKJMFNRZF03urds%2F16.png?alt=media&#x26;token=ab880ebd-0b6c-49cf-b2f4-26197ea1ea54" alt=""><figcaption></figcaption></figure>

22. Click on Create.
23. Click on Users.

<figure><img src="https://1778922777-files.gitbook.io/~/files/v0/b/gitbook-x-prod.appspot.com/o/spaces%2F3EUK5AUZv0UVaI5S0CTM%2Fuploads%2FZBAnLMjRJdIGUPqlkFSw%2F17.png?alt=media&#x26;token=2fc6f9c6-ad5b-46f5-bcbc-77b76eea5db4" alt=""><figcaption></figcaption></figure>

24. Again, click on Add user.&#x20;
25. Enter the relevant details.

<table><thead><tr><th width="140">Field Name</th><th width="188">Mandatory (Yes/No)</th><th width="108">Field Type</th><th>Description</th></tr></thead><tbody><tr><td>Username</td><td>Yes</td><td>Text</td><td>Enter the username for the user</td></tr><tr><td>Email </td><td>Yes</td><td>Text</td><td>Enter the preferred Email ID of User</td></tr><tr><td>First Name</td><td>No</td><td>Text</td><td>Enter the First name of User</td></tr><tr><td>Last Name</td><td>No</td><td>Text</td><td>Enter the Last name or Surname of User</td></tr></tbody></table>

<figure><img src="https://1778922777-files.gitbook.io/~/files/v0/b/gitbook-x-prod.appspot.com/o/spaces%2F3EUK5AUZv0UVaI5S0CTM%2Fuploads%2Ffwvu20PnPf0AKaoYZkbi%2F18.png?alt=media&#x26;token=82f54f79-5de4-4ccc-b5f3-bfc358036e42" alt=""><figcaption></figcaption></figure>

26. Click on Create.

Both the users should have the same phone number.

Now to check if the One-to-Many feature is working correctly, go to the User Console.

1. Login using the Try Another Way option.

<figure><img src="https://1778922777-files.gitbook.io/~/files/v0/b/gitbook-x-prod.appspot.com/o/spaces%2F3EUK5AUZv0UVaI5S0CTM%2Fuploads%2FkiEVycTG7BjPE9Iw8ZyX%2F19.png?alt=media&#x26;token=16563e10-dda1-4809-86cc-c673bf512be1" alt=""><figcaption></figcaption></figure>

2. Click on Advanced OTP option.

<figure><img src="https://1778922777-files.gitbook.io/~/files/v0/b/gitbook-x-prod.appspot.com/o/spaces%2F3EUK5AUZv0UVaI5S0CTM%2Fuploads%2FyxKQNYdyvI5Jx0tBZAHE%2F20.png?alt=media&#x26;token=dc83bb51-9120-42ba-9878-14cc495135c4" alt=""><figcaption></figcaption></figure>

3. Enter the Phone Number.

<figure><img src="https://1778922777-files.gitbook.io/~/files/v0/b/gitbook-x-prod.appspot.com/o/spaces%2F3EUK5AUZv0UVaI5S0CTM%2Fuploads%2FlBoSzllxUqIzpnZrK9le%2F21.png?alt=media&#x26;token=f74f409f-5056-41ea-8435-86594318f4d0" alt=""><figcaption></figcaption></figure>

4. Click on Send OTP.
5. Then it will take to the below screen, where you have to select the User.

<figure><img src="https://1778922777-files.gitbook.io/~/files/v0/b/gitbook-x-prod.appspot.com/o/spaces%2F3EUK5AUZv0UVaI5S0CTM%2Fuploads%2Fqcds2MZP4Vuhh5vBZvFI%2F22.png?alt=media&#x26;token=4a722c92-680f-418d-a3be-1a80f7baede4" alt=""><figcaption></figcaption></figure>

6. Click on the dropdown and select the user with which you want to login.

<figure><img src="https://1778922777-files.gitbook.io/~/files/v0/b/gitbook-x-prod.appspot.com/o/spaces%2F3EUK5AUZv0UVaI5S0CTM%2Fuploads%2FyKVXxW44oMF8pMBJxiGu%2F23.png?alt=media&#x26;token=ae6f8982-4b6d-48b5-b7e0-8ba388df25c7" alt=""><figcaption></figcaption></figure>

7. Now click on Send OTP.

<figure><img src="https://1778922777-files.gitbook.io/~/files/v0/b/gitbook-x-prod.appspot.com/o/spaces%2F3EUK5AUZv0UVaI5S0CTM%2Fuploads%2FRwNLPYVaZp5cPJu1tjHc%2F24.png?alt=media&#x26;token=da5c4418-d143-4db2-b975-04ade929000e" alt=""><figcaption></figcaption></figure>

8. Enter the OTP in the space provided.
9. Click on Submit.

You will be logged in to the user’s account that you selected.

<figure><img src="https://1778922777-files.gitbook.io/~/files/v0/b/gitbook-x-prod.appspot.com/o/spaces%2F3EUK5AUZv0UVaI5S0CTM%2Fuploads%2FYELE3k1U4GE88GWZmvLS%2F25.png?alt=media&#x26;token=d39f32e1-301d-4903-a6c9-77db24554a67" alt=""><figcaption></figcaption></figure>

In this way, One-to-Many feature is setup

<br>
